How to Create Banner, Label and Badge Templates in Illustrator
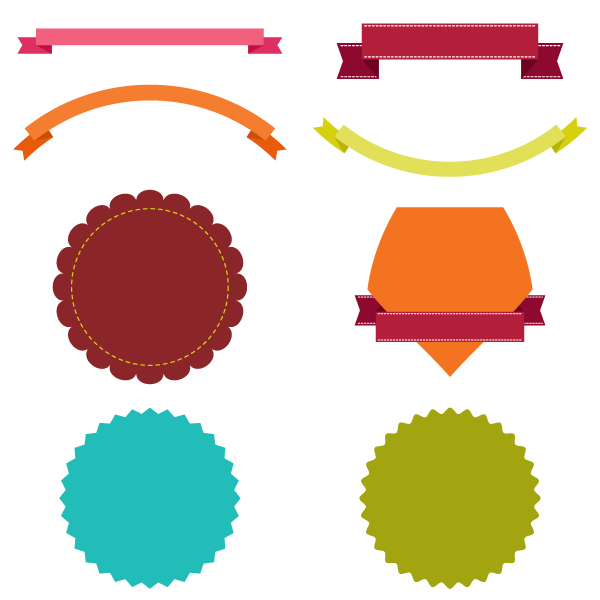
In this tutorial you will learn how to create different banner, label and badge templates which you can use in your future art projects.
1. Create a Traditional Banner
Step 1
After creating a New document, take the Rectangle Tool (M) and draw a long rectangle. Set its color to (R=241, G=96, B=124).

Step 2
Draw another rectangle to the back by pressing Control-C, Control-B keys. Make it darker (R=221, G=47, B=97).

Step 3
Switch on the Smart Guides (View Smart > Guides) and put an anchor point in the middle of the left side of our rectangle. Take the Direct Selection Tool (A) and move the anchor point to the right.


Step 4
Select two created shapes and make a copy of them (Control-C, Control-F). Then go to Pathfinder panel and press the Intersect button. Color the new shape in colorR=196, G=14, B=66.

Step 5
And now - the trick: take the Direct Anchor Point Tool (A) and select two anchor points as shown in the image below. Go to Align panel and press Vertical Align Bottom.

You will get this:

Step 6
Select the darkest shape, right-click on your mouse and choose Arrange > Send Backward.

Step 7
It's good if the Smart Guides (View > Smart Guides) are still switched on. It will be easier for you to make a reflection.
Select the darker (R=221, G=47, B=97) and the darkest (R=196, G=14, B=66) rectangles (remember to hold the Shift button for selecting two shapes at the same time) and press right-click on your mouse. Then select Transform > Reflect andVertical axis of reflection in a new appeared window, and press Copy. Move the new copies to the right. That's it!

2. Create a Curved Upwards Banner
Step 1
Make another copy (Control-C, Control-V) of this banner and change its color to orange. I used R=244, G=125, B=48 (orange), R=232, G=90, B=12 (darker orange) and R=207, G=77, B=6 (darkest orange). But of course, you can use any color you want.

Step 2
Group the whole banner (right-click > Group). Go to Effect > Warp > Arc and adjust the options like on the image below.

Step 3
Let's create a curved downwards banner.
Make a copy of the orange banner and change its color to yellow. Make sure that the whole banner is grouped. Go to the Appearance panel and click on the Warp: Arc. In the appeared window in a Bend section set the value as -50%. Below you can see result:

3. Create a Banner with a Stitched Effect
Step 1
For changing colors use the next values: R=179, G=30, B=59 (lightest red); R=142, G=9, B=47 (darker red); R=109, G=3, B=33 (darkest red). Stretch the banner using theSelection Tool (V).

Step 2
Draw two white lines using the Line Segment Tool (\).

Step 3
Go to the Stroke panel and check Dashed Line. In a first dash box enter 4 pt.

Step 4
Put these dashed lines on the back shapes of the banner.

Step 5
And on the other side.

4. Create a Badge with the Zig-Zag Effect
Step 1
Using the Ellipse Tool (L), draw a blue ellipse (R=34, G=188, B=185).

Step 2
Go to Effect > Distort and Transfort > Zig Zag. Adjust the options as shown on the image below:

Step 3
Create one more copy of this label, make sure that resulting shape is selected and take a look on the Appearance panel.
Click on Zig Zag and in the Points section check Smooth instead of Corner. Change the fill color to R=163, G=165, B=16.

5. Create a Badge with the Pucker & Bloat Effect
Step 1
Take the Polygon Tool and simply click on your artboard. In window enter 20 sidesand press OK. Set its color at R=138, G=37, B=41.

Step 2
Now press Effect > Distort and Transform > Pucker and Bloat. Move the slider to the right until you get 9%, OK.

Step 3
Take off the fill color. For the stroke color use values: R=213, G=209, B=14.
Draw a circle inside, using the Ellipse Tool (L) and on the Stroke panel check theDashed Line box. Set 8 pt in a first dash box.

6. Create a Basic Shield Shape
Step 1
Take the Rectangle Tool (M) and draw a rectangle with the fill color R=243, G=115, B=33. Using the Smart Guides to put an anchor point on the bottom of the rectangle with the Pen Tool (P).

Step 2
Press the Direct Selection Tool (A) and shift down the new anchor point.

Step 3
Press Effect > Warp > Bulge and adjust the options in appeared window like on the image below.

Step 4
Put the banner, created in a Step 3 in a front and see how it looks.

Step 5
Make a Horizontal reflection of the banner: select the whole banner, right-click on the mouse and press Transform > Reflect. Then choose Horizontal, OK.

Advertisement
Step 6
If your banner was grouped, Ungroup it (right-click > Ungroup). Put the corresponding parts to the back (Control-X, Control-B).

Great Job, You're Now Done!
So, in a few simply steps you learned how to create different banners, labels and badges. You have the templates, just add some text and design elements. Congratulations, you did a wonderful job!

Subscribe to:
Post Comments
(
Atom
)

No comments :
Post a Comment